

Choco Harvest: From Pod to Truffle
The choco harvest begins with selecting ripe cacao pods, extracting the beans, and fermenting them to develop flavor. This sequence transforms raw fruit into the ingredients needed for baking and confectionery.

Harvesting requires manual precision because cacao pods ripen unevenly on the tree. A machete or pruning hook is used to make a clean cut through the stalk, ensuring the tree is not damaged and that only fully ripe pods are removed. This manual approach preserves the integrity of the beans inside, which is essential for developing the complex flavor profiles needed for gourmet chocolate.
Identify and cut ripe pods safely
The quality of your Choco Harvest begins before the pod ever hits the ground. Cocoa pods ripen irregularly on the trunk and branches, meaning a tree might hold green, ready, and over-ripe fruit simultaneously. Picking too early yields bitter, underdeveloped beans, while leaving them too long risks fermentation or germination inside the shell. Manual harvesting remains the standard because machines cannot distinguish ripeness or damage the delicate tree structure.
1. Spot the color shift
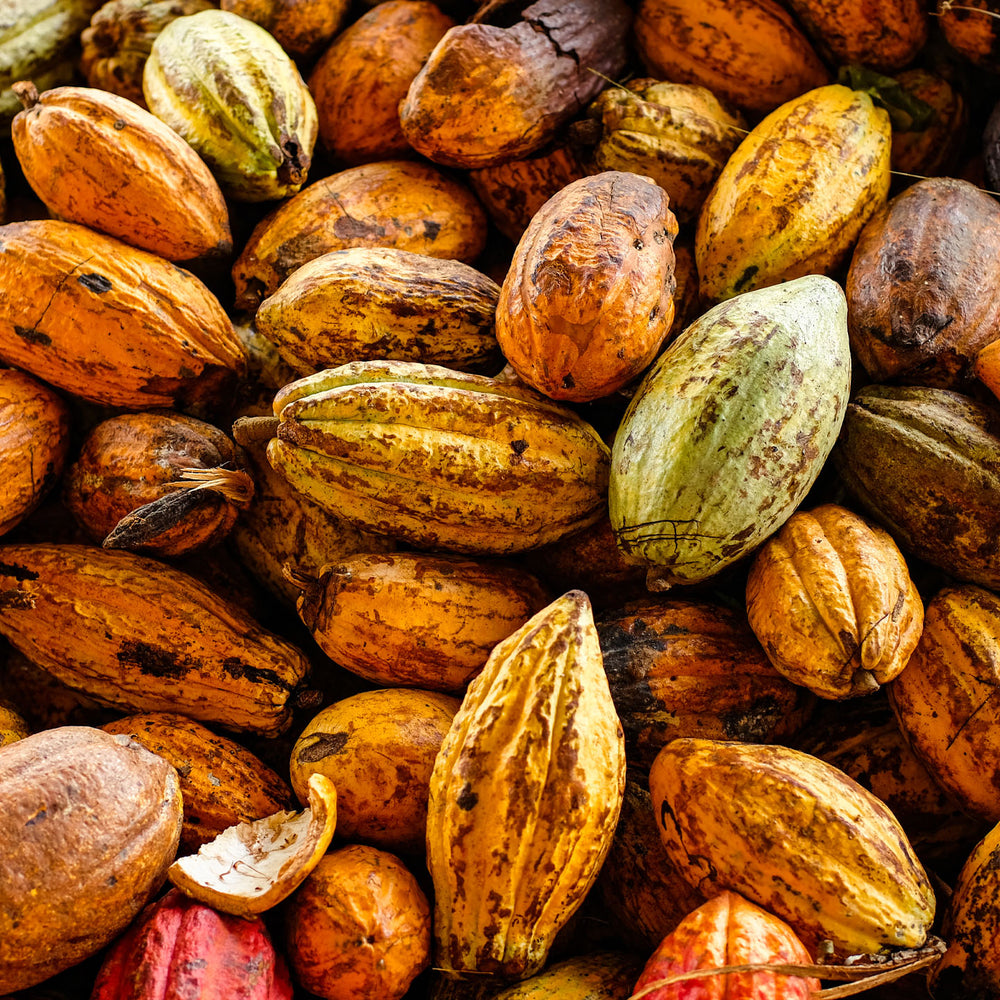
Visual cues are your primary indicator of readiness. While colors vary by variety—ranging from bright yellow to deep red or orange—look for the transition from the tree’s dominant green to the variety’s mature hue. The skin often loses its waxy sheen and becomes matte. Gently tap the pod; a ripe one produces a hollow sound, whereas a green pod sounds dull and solid. Avoid pods that show soft spots or dark discoloration, which indicate over-ripeness or disease.
Look for the specific color shift of your variety. Ripe pods lose their green tint and often develop a matte finish. Tap the pod to check for a hollow sound, distinguishing it from the dull thud of unripe fruit.
Use a machete for low-hanging pods or a pruning hook on a long pole for those high in the canopy. Position the blade just above the stem attachment point. Keep your body stable and the tool sharp to ensure a clean slice rather than a tear.

Slice through the stem cleanly in one motion. Do not hack at the branch, as this damages the spurs where next year’s flowers will form. Catch the falling pod to prevent bruising the shell upon impact with the ground.
2. Cut without damaging the tree
Precision matters more than speed. Cocoa trees produce flowers and fruit directly on their main trunks and older branches (a trait called cauliflory). A sloppy cut that nicks the bark or removes a flower spur can reduce next season’s yield. Always cut just above the stem attachment, leaving a small stub that will dry and heal without inviting rot into the branch.
For high canopy pods, use a long-handled pruning hook. Swing gently to slice the stem, then use a bag or net attached to the hook to catch the pod. Dropping pods from height causes internal bruising, which accelerates spoilage and ruins the bean quality. Collecting them carefully preserves the integrity of the Choco Harvest from the very first step.
Extracting and fermenting beans
The quality of your final Choco Harvest depends entirely on what happens immediately after the pod is opened. Leaving the beans to sit in their sweet pulp allows natural yeasts to break down sugars, creating the complex flavor precursors that define fine chocolate. Skipping or rushing this stage results in flat, acidic, or overly bitter beans that no amount of roasting can fully fix.
Step 1: Split and scoop
Use a machete or pruning hook to cleanly slice the ripe pod from the tree. Pry the thick husk open to reveal the white, mucilaginous pulp surrounding the wet beans. Scoop the beans and pulp directly into a clean fermentation vessel. Avoid using metal tools that might contaminate the beans with off-flavors; wood or food-grade plastic is preferred.
Use a sharp blade to slice the pod from the tree trunk. Pry the husk open carefully to expose the beans without damaging them. The beans should be coated in a thick, white, sugary pulp.
Scoop the beans and pulp directly into a shallow wooden box or plastic bin. Ensure the container has drainage holes at the bottom to allow excess liquid to escape during fermentation.
Cover the beans with clean banana leaves or a breathable cloth. This maintains heat and humidity while allowing gases to escape. Let the beans rest undisturbed for the required fermentation period.
Step 2: Manage the fermentation
Fermentation is a biological process driven by wild yeasts and bacteria. It typically lasts between five to seven days, depending on the bean variety and ambient temperature. During this time, the pulp liquefies and drains away, the beans turn from purple to brown, and the internal temperature rises to roughly 50°C (122°F).
Turn the beans every two to three days to ensure even exposure to oxygen and heat. This prevents mold growth and ensures that all beans develop flavor uniformly. If the beans remain purple or show signs of mold, the fermentation was likely too cool or poorly aerated.
Step 3: Dry the beans
Once the beans have turned a uniform brown and lost their acidic taste, they must be dried immediately to halt fermentation. Spread the beans in a thin layer on raised drying racks or clean tarps under direct sunlight. Turn them regularly to prevent clumping and ensure even drying.
The beans are ready when they crack cleanly when bitten and have a moisture content of below 7%. This process usually takes another five to seven days. Properly dried beans can be stored for months without spoiling, preserving the Choco Harvest potential for gourmet truffle production.
Drying and roasting for flavor
Drying and roasting are the final hurdles before chocolate reaches your palate. These steps stabilize the beans against spoilage and reveal the complex aromatic compounds that define high-quality Choco Harvest. Without them, cocoa beans remain bitter and muddy; with them, you get the deep, nuanced flavors found in gourmet truffles.
Drying the beans
Freshly fermented beans contain about 60% moisture. If left wet, they will mold and rot within days. Drying reduces this moisture content to below 7%, creating a stable product that can be stored or shipped without degrading.
Spread the beans in a thin layer on raised drying beds or clean tarps. Turn them regularly to ensure even exposure to sunlight and air. This process can take anywhere from three to seven days, depending on weather conditions. The goal is a slow, steady reduction in moisture that preserves the flavor precursors developed during fermentation.
Roasting for flavor development
Roasting is where the magic happens. Heat triggers the Maillard reaction, a chemical process between amino acids and sugars that creates hundreds of new flavor compounds. It also eliminates any remaining microbes and loosens the bean shells for easy removal.
Heat the dried beans in a roaster or oven at temperatures between 250°F and 300°F (120°C–150°C). The time varies from 15 to 30 minutes based on bean size and desired flavor profile. Listen for a crackling sound similar to popcorn; this indicates the shells are separating. Smell the air—nutty, floral, or fruity notes signal that the roast is progressing correctly.
Cooling and winnowing
Once roasted, the beans must cool quickly to stop the cooking process. Spread them out on a tray or use a fan to lower the temperature rapidly. This prevents the beans from steaming in their own heat, which can lead to off-flavors.
After cooling, the brittle shells crack open. Use a winnowing machine or a gentle breeze to blow away the lightweight husks, leaving behind the clean cocoa nibs. These nibs are now ready to be ground into chocolate liquor, the foundation of all chocolate products. The careful attention to drying and roasting ensures that every bite of your final Choco Harvest creation delivers the intended depth and richness.
Spread fermented beans in a thin layer on raised beds. Turn them regularly for 3-7 days until moisture drops below 7%.
Heat beans at 250°F-300°F for 15-30 minutes. Listen for cracking and smell for nutty or fruity notes to gauge progress.
Cool beans rapidly to stop cooking. Winnow to remove brittle shells, leaving clean nibs ready for grinding.
Melt chocolate chips without seizing
Melting chocolate for the Choco Harvest process requires patience and precision. Chocolate is temperamental; a single drop of water or too much heat will cause it to seize, turning smooth chips into a grainy, unusable lump. Follow this sequence to ensure a glossy, pourable finish for your truffles.
Place your chocolate chips in a clean, completely dry heatproof bowl. Ensure no water droplets remain from washing, as this is the most common cause of seizing.
Fill a saucepan with a few inches of water and bring it to a bare simmer over medium-low heat. You want gentle steam, not a rolling boil that creates excessive moisture.
Set the bowl over the saucepan, ensuring the bottom does not touch the water. Stir constantly with a dry spatula. The indirect heat melts the chocolate evenly without scorching.
Remove the bowl from the heat just before the chocolate looks fully melted. Continue stirring until any remaining lumps dissolve. The residual heat will finish the process.
Once melted, the chocolate should be glossy and fluid. If it thickens too much, add a tiny teaspoon of warm water or cream and stir vigorously to restore consistency. Use immediately for molding your Choco Harvest truffles.
Crafting gourmet truffles at home
Turning your Choco Harvest into finished truffles is the final, rewarding step in the journey from pod to plate. This process relies on patience and precision, transforming simple melted chocolate into a sophisticated confection. By following a clear sequence, you can achieve professional results in your own kitchen.
Begin by chopping your high-quality chocolate into uniform pieces. This ensures even melting and prevents scorching. Place the chocolate in a heatproof bowl set over a pot of barely simmering water, or use a microwave in short bursts. Stir gently until the chocolate is completely smooth and fluid. Avoid introducing any water or steam into the mixture, as even a drop can cause the chocolate to seize and become grainy.
Pour warm heavy cream over the melted chocolate. Let it sit for two minutes to allow the heat to soften the chocolate, then stir slowly from the center outward until glossy and homogenous. This mixture, known as ganache, forms the rich interior of your truffles. Cover the bowl with plastic wrap pressed directly onto the surface to prevent a skin from forming. Refrigerate for at least two hours, or until the ganache is firm enough to scoop.
Once the ganache has set, use a small melon baller or spoon to scoop out portions. Roll each piece quickly between your palms to form smooth spheres. Keep your hands cool to prevent the chocolate from melting too much. If the ganache is too sticky, chill it for another fifteen minutes. Place the formed balls on a parchment-lined tray while you prepare your coating options.
Roll the chilled truffles in cocoa powder, crushed nuts, or tempered chocolate for a polished finish. For a classic look, dust them generously with unsweetened cocoa powder. For a more elegant presentation, dip each truffle halfway into melted chocolate using a fork. Transfer them to a fresh tray and allow them to set at room temperature or in the refrigerator for thirty minutes before serving.
-
Chocolate is finely chopped for even melting
-
Ganache is firm enough to hold shape when scooped
-
Coating ingredients are prepared in shallow bowls
-
Truffles are stored in an airtight container away from heat
No comments yet. Be the first to share your thoughts!